おはこんにちばんは。Next.jsで実装した静的サイトのサイトマップを生成してみました。
その手順を記載します。サンプルコードはこちら。
実行環境
- Next.js 10.0.0
- React 17.0.1
プロジェクトの設定
まずは、雑に静的ページを生成します。
./pages /[dynamic]/index.js
1import { GetStaticPaths, GetStaticProps, NextPage } from 'next'
2import React from 'react'
3import { useRouter } from 'next/router';
4
5const DynamicPage: NextPage = () => {
6 const router = useRouter();
7 return (
8 <div>
9 <h1>{router.query.dynamic}</h1>
10 </div>
11 )
12}
13
14export const getStaticPaths: GetStaticPaths = async () => {
15 const paths = [...Array(10)].map((_, index) => ({
16 params: {
17 dynamic: `${index}`,
18 },
19 }))
20
21 return { paths, fallback: false };
22}
23
24export const getStaticProps: GetStaticProps = async (context) => {
25 return {
26 props: {},
27 }
28}
29
30export default DynamicPage
31
packageを追加
今回は next-sitemap というpackageを利用します。
1yarn add next-sitemap -D
次にルート配下に next-sitemap.js という設定ファイルを作成します。
1module.exports = {
2 siteUrl: "https://www.example.com",
3 generateRobotsTxt: true,
4};
最後にプロジェクトがビルドされるたびにサイトマップ生成をするようにするため、package.jsonのscriptに以下を追加します。
1"postbuild": "next-sitemap"
プロジェクトをビルドする
そうするとpublic配下に以下のようなrobots.txtとsitemap.xmlに生成されたかと思います。サイトマップにはすべての静的ページが記載されています。
1User-agent: *
2Allow: /
3Host: https://www.example.com
4Sitemap: https://www.example.com/sitemap.xml
1<?xml version="1.0" encoding="UTF-8"?>
2<urlset xmlns="http://www.sitemaps.org/schemas/sitemap/0.9" xmlns:news="http://www.google.com/schemas/sitemap-news/0.9" xmlns:xhtml="http://www.w3.org/1999/xhtml" xmlns:mobile="http://www.google.com/schemas/sitemap-mobile/1.0" xmlns:image="http://www.google.com/schemas/sitemap-image/1.1" xmlns:video="http://www.google.com/schemas/sitemap-video/1.1">
3<url><loc>https://www.example.com/</loc><changefreq>daily</changefreq><priority>0.7</priority><lastmod>2020-11-03T07:56:27.537Z</lastmod></url>
4<url><loc>https://www.example.com/0</loc><changefreq>daily</changefreq><priority>0.7</priority><lastmod>2020-11-03T07:56:27.537Z</lastmod></url>
5<url><loc>https://www.example.com/1</loc><changefreq>daily</changefreq><priority>0.7</priority><lastmod>2020-11-03T07:56:27.537Z</lastmod></url>
6<url><loc>https://www.example.com/2</loc><changefreq>daily</changefreq><priority>0.7</priority><lastmod>2020-11-03T07:56:27.537Z</lastmod></url>
7<url><loc>https://www.example.com/3</loc><changefreq>daily</changefreq><priority>0.7</priority><lastmod>2020-11-03T07:56:27.537Z</lastmod></url>
8<url><loc>https://www.example.com/4</loc><changefreq>daily</changefreq><priority>0.7</priority><lastmod>2020-11-03T07:56:27.537Z</lastmod></url>
9<url><loc>https://www.example.com/5</loc><changefreq>daily</changefreq><priority>0.7</priority><lastmod>2020-11-03T07:56:27.537Z</lastmod></url>
10<url><loc>https://www.example.com/6</loc><changefreq>daily</changefreq><priority>0.7</priority><lastmod>2020-11-03T07:56:27.537Z</lastmod></url>
11<url><loc>https://www.example.com/7</loc><changefreq>daily</changefreq><priority>0.7</priority><lastmod>2020-11-03T07:56:27.537Z</lastmod></url>
12<url><loc>https://www.example.com/8</loc><changefreq>daily</changefreq><priority>0.7</priority><lastmod>2020-11-03T07:56:27.537Z</lastmod></url>
13<url><loc>https://www.example.com/9</loc><changefreq>daily</changefreq><priority>0.7</priority><lastmod>2020-11-03T07:56:27.537Z</lastmod></url>
14</urlset>
15
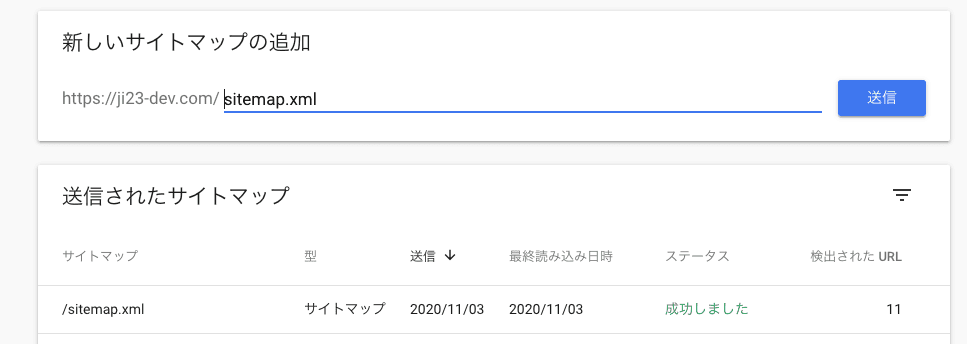
Google Serch Consoleからサイトマップを登録する
あとは、Google Serch Consoleの管理画面からサイトマップを追加します。https://www.example.com/sitemap.xml で登録可能です。
正しく実装出来ていれば、以下のようにURLを検出してインデックスされるはずです。お疲れ様でした。
さいごに
このブログ自体のサイトマップを作成していなかったので、実装してみました。とても簡単ですね。
参考
https://www.iamvishnusankar.com/blogs/how-to-generate-sitemap-for-nextjs-projects/